
 Facebook
 Twitter
 Pinterest
 Copy Link
Energize Your Home This Winter With Bright Hues

Bright hues are eye-catching, confident and cheering — so if winter’s got you feeling less than energized, why not tap into the power of bright colors to lift your spirits and your decor? Read on for 10 reasons to give bright, zesty hues a try in your home this winter.

Bright Hues 1: Bronwyn Poole by Touch Interiors, original photo on Houzz
1. Bright hues help with the whole rising and shining thing. Zingy brights are like caffeine for your space. If you’ve been dragging on these dark winter mornings, perhaps a colorful bedroom makeover would help things along. Artwork, pillows and a throw can be easily swapped out now, and again when you feel like a change.

Bright Hues 2: Bronwyn Poole by Touch Interiors, original photo on Houzz
2. Bright hues are playful. Lighten the mood at home with fun, colorful pieces, like the oversize geometric artwork and bright blue vintage rug shown in this space. Colors this bold are packed with personality and perfect in spaces where you host parties or play with your kids.
3. Bright hues are a winter palette cleanser. Been feeling oversaturated by red, green and woodsy decor? Acid brights can act as a refreshing palette cleanser. Clear away the holiday decor and start fresh with a clean, crisp pairing of white and brights.

Bright Hues 3: Emma Blomfield, original photo on Houzz
4. Bright hues are mood boosters. Bright, bold colors are undeniably cheerful. Even if you typically shy away from bright hues, consider making an exception in the winter. The infusion of color can be a great pick-me-up!
5. Bright hues are gutsy. Claim your space and make a statement with a big decorating move, like bold wallpaper or a bright, graphic rug. Bright hues exude confidence — perfect when you are looking to make a fresh start in your life.

Bright Hues 4: Tobi Fairley Interior Design, original photo on Houzz
6. Bright hues offer contrast to the gray outdoors. Dismal weather got you down? Cheer up your foyer with sunshine yellow. Spaces with large windows can also become a bit of a downer when the skies are cloudy — refresh a living room or kitchen with sunshiny hues to counteract the gloom.
7. Bright hues bring a dash of romance. From the shiny red of London buses to the bright turquoise of a zippy Italian scooter, the colors of a place are often one of the most memorable parts of traveling. Bring back a bit of the romance of your favorite destinations with a collection of colorful travel photos on the wall. Or pick up colors from your most cherished places in smaller doses — like bright buttons on a dapper gray armchair.

Bright Hues 5: 50 Degrees North Architects, original photo on Houzz
8. Bright hues can help you feel more productive. Give your home workspace a jolt to keep yourself sharp and focused. Try a brightly hued desk chair or filing cabinet, or arrange your bookshelves in rainbow order. Even a vase of bright blooms and a new pen cup on the desk can do the trick!
Related: Outfit Your Workspace With Stylish Office Furniture

Bright Hues 6: Reiko Feng Shui Design, original photo on Houzz
9. Bright hues wake up winter white. If your winter decorating scheme tends towards pure wintry whites and subtle glints of metallic hues, consider punching things up with a bright accent or two. In the space shown here, a cluster of pillows and a glamorous chandelier dripping in turquoise beads transforms a plain landing into a jaw-dropping one.
10. Bright hues give you a taste of spring when you need it most. Why wait for the first daffodils, when you can have a wonderfully bright yellow door right now? Stop trudging through winter waiting for spring, and treat yourself to springy colors today.
By Laura Gaskill, Houzz
6 Extreme Interior Paint Makeovers
Today we’re looking at how paint has changed your rooms, from the kitchen to the bedroom, from the living room to the laundry room.

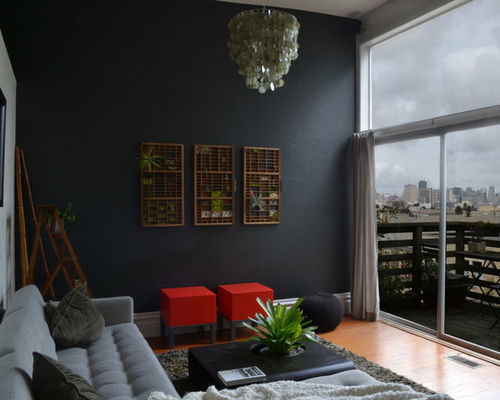
Makeover 1: Stephanie Van Dyke, original photo on Houzz
AFTER: Houzz user Stephanie Van Dyke’s newly dark living room walls.

Makeover 2: Before Photo, original photo on Houzz
BEFORE: Van Dyke wanted to switch up these light walls. The new colors are Ralph Lauren’s Smoked Glass and Tibetan Jasmine. “The Smoked Glass is a beautiful, dynamic color that changes throughout the day,” she says.

Makeover 3: Before Photo, original photo on Houzz
BEFORE: Houzz user and blogger c2marsha did not have much love for this pale green color in her bedroom. “The old pale green color just felt really stale and boring; we wanted something bolder but not bright or harsh,” she says.
Related: Add Style and Function With a New Bedroom Bench

Makeover 4: c2marsha, original photo on Houzz
AFTER: “We chose Behr Bitter Chocolate for our master bedroom, which sits on the second floor of our Dutch colonial in Minneapolis,” she says. “We didn’t want our room to feel too feminine or masculine, and we wanted it to feel like it fit us well, which made it very difficult to pick a color!”
The rich brown brought in a modern touch that works with their mix of vintage and traditional pieces.

Makeover 5: Before Photo, original photo on Houzz
BEFORE: Maple trees surrounding the house and the colors on the walls made Houzz user hellovijp’s home in Quebec City very dark inside.

Makeover 6: hellovijp, original photo on Houzz
AFTER: Because one room flows into the next and the spaces were lacking cohesion, hellovijp painted the entire floor the same color, SICO’s Portobello #6185-41. It really lightens things up while keeping the look warm.

Makeover 7: Before Photo, original photo on Houzz
BEFORE: Amanda Haytaian wanted a fresh look for her living room; pink walls and a dated fireplace were no longer working.

Makeover 8: Amanda Haytaian, original photo on Houzz
AFTER: She brought the pink into the room via smaller accents. A beautiful new coffered ceiling and marble fireplace surround freshen up the space. The walls are Benjamin Moore’s Etiquette in matte, and the trim is Benjamin Moore’s Steam in semigloss.

Makeover 9: Before Photo, original photo on Houzz
BEFORE: Becky, of the blog this is happiness, had been dreaming of a whiter kitchen.

Makeover 10: Becky, original photo on Houzz
AFTER: “It’s still a work in progress, but we took our very dark kitchen to a cheerful, bright white,” she says. Kwal acrylic paint in Pure Snow did the trick.
Tip: She recommends having the cabinets spray painted to avoid brushstrokes.

Makeover 11: Before Photo, original photo on Houzz
BEFORE: “This laundry room is a great example of white not making a poorly lit, windowless room light and airy; it just made it gray, dingy and scuff-marked,” says Cathy Zaeske.

Makeover 12: Cathy Zaeske, original photo on Houzz
AFTER: Going for an industrial chic look, she chose a new pendant light and Sherwin-Williams’ high-gloss 6076 Turkish Coffee. The new room is much better at inspiring the homeowners to want to do their laundry.
By Becky Harris, Houzz
How to Plan a Renovation That Matches Your Budget

The key to keeping a project on budget and on schedule is nailing down the details before ground breaks. If you’ve never renovated or built a new home, you may not be sure about how the seed of an idea turns into a completed project. Here’s a road map for two early steps: putting together your renovation team and nailing down your project’s cost.
Bookmark Part Two in This Dream to Done Series

Dream To Done 1: Serenity Design, original photo on Houzz
Who Will Help You Build Your Vision?
Before you meet with a professional, you should know what you want to accomplish. Is your goal to tear out your entire kitchen and start fresh? Or are you looking for less costly upgrades, perhaps replacing cabinet fronts and a tired back splash? Or do you want to remodel your whole house?
Some homeowners know only that the current home isn’t working for them but aren’t sure how to fix it. If you are in this group, you may decide to work with professionals who can help you develop a plan and advise you on cost. A recent survey showed that 85 percent of Houzzers who renovated in 2015 did so with professional help. The survey covered 120,000 registered Houzz users, including 70,000 who renovated.

Dream To Done 2: SALA Architects, original photo on Houzz
What Exactly Do Pros Do?
The most important documents you will need are the construction plans. Your building plans must be approved by an agency to make sure the home is safe and meets local codes. So unless you are familiar with building codes and construction methods, you will want to hire a professional to draft these plans. Rules for which pros can draft plans vary by state (and in some states by county or municipality) and with the size and type of project. Look to the local building department or the professionals you contact to explain the rules in your area.
Each profession has its special emphasis. Architects and interior designers create concepts and draw plans. General contractors build the plans. Landscape architects create designs and plans for outdoor spaces. Design-build firms offer both design and building services, some with in-house architects, others by contracting the design work out.
Houzzers who remodeled in 2015 said the most valuable contributions of general contractors and design-build firms were delivering a quality result, finding the right products and materials, staying on budget and managing the project.
Architects, interior designers, and kitchen and bath designers were appreciated for helping clients integrate their personal style into the design. Houzzers valued architects for understanding and complying with local building codes, and interior designers for finding the right products or materials. But these are only their most-appreciated contributions; each profession has a wide range of skills and resources to offer owners.
Ask About Options
Many pros offer a range of services, from initial design to project management, which may be priced as menu options or charged at per-hour rates. For just one example, architects can provide evaluation and planning services, which can involve site analysis and selection, economic feasibility studies and helping you determine what you want, need and are willing to pay for.
Architecture firms offer design services, including documents that define the space’s shape, and they may work closely with engineers as needed in relationship to the structural elements. They also may offer construction management services, involving consulting and coordinating with the various agencies overseeing your project, or manage the bidding process when you search for the right contractor. These are just a handful of the services your architect may provide, so it is worth asking about pricing and what is involved as you shop around. This AIA guide can be helpful. Also, there could be some overlap in the menus of services provided by the different pros, so be sure that you are clear on what you need and what services each will perform.
Even if you are not planning to hire a professional to design or manage your renovation, you may want to hire a pro on a per-hour basis to help you refine your ideas. “A small percentage of upfront money with a professional can really help clarify the scope of the project and the budget before you get too involved,” says John Firmin, general contractor at Build-A-Home Inc., in Fayetteville, Arkansas, who founded the firm 16 years ago.

Dream To Done 3: Tim Clarke Design, original photo on Houzz
Select Your First Team Member
When hiring your first design team member, you can start with a builder, architect, designer, design-build firm or remodeler, depending on your needs and priorities. If you already know a contractor whose work you like, he or she will probably have a list of architects and interior designers to recommend. That is also true if you start with other pros. You also can use Houzz’s directory to find individual professionals, see their past projects and read client reviews.
Narrow your list down to your favorites and then interview a few people. Ask for — and check — references, and drive out to see past projects. Also, see how it might feel to work together — make sure you have a rapport with the professional. You should find out whether they listen and whether they are good communicators, says Jon Dick, an architect with Archaeo Architects in Santa Fe, New Mexico, who has been practicing 30 years and worked on more than 100 homes. “Their design ability is very important,” Dick says. “But it’s also a long-term relationship. They’re going to ask pretty personal questions and know a fair amount about you.”
You should follow this same basic process with an interior designer, landscape architect, general contractor or design-build firm. Keep in mind that the average kitchen remodel takes about five months once construction starts, but three times that long from initial design phase to completion, according to a recent Houzz survey. So the professionals you hire should be people you like and can communicate with.
Whether to Hire One Pro — or More
Which pros and how many you hire is up to you. Among Houzzers who hired pros for their renovation projects last year, nearly half hired a general contractor, builder, kitchen or bath remodeler, or design-build firm — the professionals who actually build the project. About 20 percent employed an architect, interior designer or kitchen and bath designer.
A recent Houzz survey found that 2015 home buyers spent $66,600 on renovations, while would-be 2016 home sellers spent $36,300 on renovations.

Dream To Done 4: Original chart on Houzz
Be Up Front About Your Number
It’s helpful to be honest about your budget with the professionals you contact. Pros typically work with clients whose budgets are within a certain range. (Sometimes a pro’s range can be found on his or her Houzz profile.) If you fall in love with a pro whose projects start at $50,000, but you have $5,000 to spend, you’re probably not a match. Some homeowners pay a high-end designer to create the initial plan, only to realize that the products and materials suggested are out of range.
Homeowners without constrained budgets may be afraid to be too forthcoming for fear that pros will push them to spend more than they would like. That’s where checking references and finding people you can communicate with comes in. In the process of vetting the pros you are considering, you will find reputable people who will not push you but use your target number to help guide your plan.
Some Averages to Go On
If you have never renovated or built a home, you may have no idea how much it’s going to cost. To give you a sense of average budgets, here are some recent stats: People renovating kitchens had budgets ranging from less than $5,000 to more than $100,000, according to a survey of nearly 2,500 owners conducted by Houzz. One-quarter of renovators had budgets of $25,001 to $50,000, while 20 percent had budgets of $15,001 to $25,000. Only 10 percent had budgets of $5,000 or less, and only 6 percent had budgets of more than $100,000. The range of figures here is national; it should be noted that renovation costs vary by region and even city.
That said, not everyone stays on budget — and that’s true regardless of geography. Only about one-third of Houzzers who renovated last year stayed on budget, while just 3 percent came in below budget. Another third exceeded their budgets, while the remaining third had no initial budget at all. Among those who exceeded their budgets, the top reason was selecting nicer finishes or materials.
Major kitchen renovations cost an average of $50,700 for spaces 200 square feet or larger, while major renos in smaller kitchens cost about half that, according to Houzz data. A major kitchen renovation includes at least replacing cabinets and appliances. Major master bathroom renovations cost an average $25,600 in rooms at least 100 square feet and about half that for smaller bathrooms. A major bath renovation includes at least replacing the vanity or cabinets and countertops and toilet. Doing it yourself, of course, is less costly.
Make Your Move


Moving is stressful, whether it is across town or cross-country. Once you have closed on your house, the reality of packing, moving, and setting up a new home can become overwhelming. While no list can make a move “stress-free”, planning ahead and staying organized can help make your move a little smoother. Here is our list of tips:
Getting started:
· Once you know your prospective move date, set up a quick timeline to make sure you can get all the important tasks done and ready in time for your move.
· Consider how much stuff you have by doing a home inventory. This can help you decide whether you need to hire movers to help you or if you will be managing your move on your own. Many moving companies supply inventory lists to help you assess the size of truck you will need. You can use your list as double duty for insurance purposes later.
· As soon as you decide how you will be moving, make your reservations. In general, moving companies and truck rental services are over-booked at the beginning and very end of the month. If you are planning on hiring a moving company, contact a few in your area for a price quote. To find companies ask your real estate agent, family, or friends, and consult online reviews. It is also a good idea to request a quote and compare companies.
Preparing for your move:
· Moving is a great opportunity to get rid of clutter, junk, or outdated items. Set aside some time to sort through your closets, storage spaces, files, drawers, and more. Go through cluttered areas and organize items by “keepers”, “give-aways” and “garbage”. You will have less to pack and an opportunity to update after you move. Contact a local nonprofit organization for your donations; some will arrange to pick up larger donations like furniture. If you have items of value, eBay or craigslist are good options.
· Changing your address is one of the more tedious tasks in the moving process. You will need to change your address with the United States Post Office. You can find the online form here: https://moversguide.usps.com/icoa/icoa-main-flow.do?execution=e1s1.
· You will also need to change your address with each account you have. Here is a list to get your started:
· Employers
· Bank(s)
· Utilities (Electric, Water/Sewage, Oil/Gas)
· Cable/ Telephone
· Cell phone service
· Credit Cards
· Magazine subscriptions
· Insurance companies (auto, home/renters, health, dental, vision, etc.)
· Pharmacy
· Other personal services
Let the packing begin:
· Before you start packing, it may help to visualize where everything you have will go. Perhaps furniture will fit better in a different room? Consider the floor plan of your new home and figure out what will go where. This will aid in packing and labeling as you box everything up.
· Use a tool like floorplanner.com to plan where furniture and items will go.
· When it comes to packing you have some options. You can work with a service that provides reusable boxes for moving or you can reuse or purchase cardboard boxes. Make sure you have enough boxes, packing tape, dark markers, and packing paper.
· Pack rooms according to your floor plan. Label boxes with contents and room. This will make it easier to unpack your home, knowing where everything is going.
· Real Simple magazine has some great tips on packing for your move.
· If you have to disassemble any of your furniture, make sure you keep all the parts and directions together.
· Make sure you set aside your necessities for the day you move. Being tired and unable to take a shower or make your bed can be hard at the end of a long moving day. Here are some ideas of what you may like to pack in your “day-of-move” boxes.
· Clean linens for the beds, pillows and blankets
· Clean towels
· Shower curtain, liner and hooks
· Toiletries, hand soap, tooth brush, etc.
· Disposable utensils, cups, napkins, etc
· Rolls of toilet paper
· Snacks and water
· Change of clothes
· Tools for reassembling furniture, installing hardware, and hanging photos
Making your move
· Come up with a game plan with your family, so everyone has a role and a part to play
· Once the house is empty, do a once over on your old place to make sure it is clean for the next owners/occupants. Here is a useful checklist for cleaning.
Warming your new home
· Once you have settled into your new home, warm it up by inviting friends and family over to celebrate. Here is a great infographic about housewarming traditions and symbolism.
· Announce your move to far-away friends and family through moving announcements to make sure you stay on the holiday card mailing list.
4 Simple Steps to Painting a Wall Faster
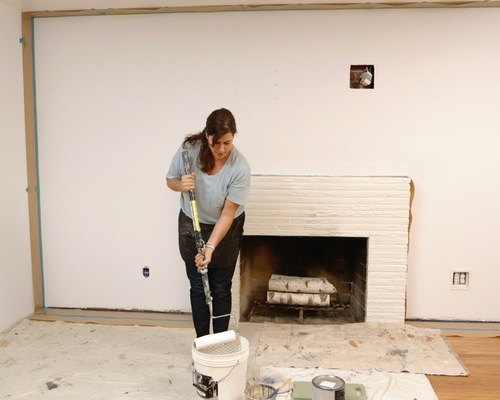

Paint Faster 1: Houzz TV, original photo on Houzz
Watch a video tutorial here
Step 1: Add Paint to the Roller
With a paint roller in hand, Gallagher dips her roller cover into the paint and then rolls it down the cage in the bucket to remove excess paint. She recommends rolling down and not up to avoid splattering paint out of the bucket. If you have excess paint on the edge of the roller, use a chip brush to wipe it off so it doesn’t drip on the wall.

Paint Faster 2: Houzz TV, original photo on Houzz
Step 2: Roll on the Paint
In rolling the paint on the wall, Gallagher uses vertical movements — rolling up and down as she moves across the wall — so she can glide right up against the taped-off edges. The paper-and-tape combo, which she applied to the wall’s edges with a tape gun, gives her extra protection against getting paint on the ceiling and adjacent walls.
Because she is painting a smooth wall with a thin roller cover, she can get closer than if she were painting a textured wall with a fluffy roller. Additionally, she rolls horizontally along the ceiling line to get even closer with the roller. She says she can roll paint within about 1 inch of her taped-off edges. If she would have cut in first, she says she might have painted a strip of 5 to 6 inches with a paintbrush.
“You are looking at a huge time savings if you roll paint first,” she says. “It might be 1½ hours versus 25 minutes.”
As she rolls, she keeps the arm of the roller on the side of the direction she is traveling across the wall. She is going from left to right, so the arm is on her right side. She uses this method because a small line of paint forms on the edge, and she can pick up that extra paint and spread it out as she goes.
Keep a Hamper Nearby for Messy Rags
After she completes a section, Gallagher lightly goes over the wall again, this time rolling only downward, to remove any roller lines and give the paint an even finish.

Paint Faster 3: Houzz TV, original photo on Houzz
Step 3: Paint the Edges
Once you have rolled paint on as much of the wall as possible, fill in the unpainted areas with a paintbrush. Because she rolled paint close to the wall’s edges, Gallagher can make quicker work of the cutting-in step of her project.
For this step, she dips her paintbrush into the paint and then removes paint from one side of the brush by wiping it along the edge of the can. She uses this side of the brush as she paints along the taped edge. Applying less paint to the taped edge keeps the taped line crisper, she says, and prevents paint from squishing up into the corner.

Paint Faster 4: Houzz TV, original photo on Houzz
Step 4: Remove the Tape
After painting, Gallagher waits until the paint is just dry before methodically removing the tape. She recommends putting your hands close to the wall and pulling the tape at a 45-degree angle.
“When you are farther away, you are yanking on the tape a little more,” she says. Her technique helps keep paint from pulling away from the wall.
When you are done, you can step back and admire a wall that you painted in a fraction of time, thanks to the reverse method.
9 Options to Remove, Hide or Play Down a Popcorn Ceiling
Related: How to Decorate Your Ceiling

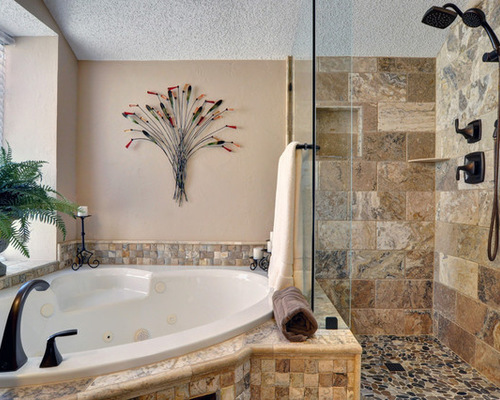
Popcorn Ceiling 1: The Kitchen Source, original photo on Houzz
From the 1950s to the 1980s, so-called popcorn ceilings (with their prickly stucco texture resembling the popular movie theater snack) were a major architectural staple in America and many other nations.
Eventually the asbestos commonly used in the application was found to be toxic, and demand severely dropped.
However, a textured ceiling does have its advantages. It reduces echoes and hides ceiling plane imperfections, which is why it’s still used (in asbestos-free formulations) today, as shown in the bathroom here.
Despite its practical uses, popcorn ceilings, for many people, are considered an unfashionable eyesore, especially with contemporary demand for “clean lines.” Also, popcorn ceilings can gather dust and be difficult to clean or repaint, which means they don’t always age beautifully.
But don’t worry. You’ve got plenty of options.

Popcorn Ceiling 2: Designs by Gia Interior Design, original photo on Houzz
Ceiling Scraping
The good news is a sprayed-on stucco coating can be scraped off to reveal the original ceiling surface, a process usually known simply as “ceiling scraping” or “stucco removal.” A specialist typically does this because (here’s the bad news) the process can be somewhat costly at around $1 to $2 per square foot. It’s a messy, labor-intensive process, hence the high cost.
Also, in some cases, the results may not achieve the crispness of a ceiling that had not been stuccoed in the first place, especially if the stucco has been painted over, which greatly complicates the removal process.
Even in the best cases the exposed ceiling will typically require at least some smoothing and patching to create a more even and crisp final product, which makes this an extensive and relatively challenging undertaking for DIYers.
While ceiling stucco no longer uses asbestos in modern applications, homes built before 1980 (or even in the early ’80s while old stucco products were still stocked) may include asbestos. If there is any doubt, a professional asbestos test should be conducted before any resurfacing, which could release heavily toxic dust.
Ceiling Replacement
One of the simplest alternatives to scraping is removing and replacing the ceiling drywall. Alternately, you can have the ceiling layered over with new drywall. The drop in the ceiling plane will often be minimal, and this method can encase asbestos rather than releasing it into the air, delaying the issue, if not resolving it.
Redrywalling a ceiling will cost closer to $4 to $6 per square foot, but the results will be more predictable.

Popcorn Ceiling 3: Diament Builders, original photo on Houzz
Covering Stucco
Speaking of layering, there are many other materials besides drywall that can be installed over a popcorn ceiling, many of which add extra personality to a room.
Related: Keep Your Cottage Cool
Beadboard. Classic beadboard makes a charming ceiling treatment, and not just in a rustic cottage. Painted white, the subtle texture of beadboard paneling works well in traditional spaces or modern ones, adding a layer of depth in an unconventional place.

Popcorn Ceiling 4: Spinnaker Development, original photo on Houzz
Panels of beadboard often cost less than 50 cents per square foot, making this a very affordable option, especially for handy DIYers.
For a contemporary twist, try finishing the ceiling in a gloss paint, as shown here. This slow-drying finish will take more labor to complete, but the results have incredible depth and elegance.
Warm wood. If you’re not into painted beadboard, try multitonal wood for a rich, inviting treatment that’s great for a den or sitting area. Contrast it with white molding and crossbeams, or let the wood speak for itself. This approach works well with rustic decor, as a gentle touch in a modernist space or somewhere in between.

Popcorn Ceiling 5: Bravehart Design Build, original photo on Houzz
Pressed tin. Whether you use true pressed tin tiles or a fiber substitute, this classic ceiling look recalls speak-easy style and makes a great cover-up for a kitchen ceiling. You can paint it white or pale gray to keep the look breezy, or an inky dark hue (like charcoal or navy) for moody atmosphere. Or choose a metallic finish for extra sheen and drama.
Many companies now provide faux pressed tin and other panel systems specifically designed to cover stuccoed or damaged ceilings. They typically cost $1 to $5 per square foot.
To have a professional install these materials for you, expect to pay several hundred dollars extra.

Popcorn Ceiling 6: The Morson Collection, original photo on Houzz
Other Options
Lighting. Sometimes the best way to deal with ceiling stucco is to de-emphasize it, and smart lighting choices can go a long way toward that.
Notice how the lighting hitting this stucco wall emphasizes the texture. Great when the effect is desired. To avoid highlighting unwanted ceiling stucco, choose lights that aim downward, rather than upward or outward, so light is cast on beautiful surfaces below and not on your ceiling itself.
Try pot lights, or semi-flush-mounts (or pendants) with an opaque shade to aim light downward rather than multiple directions.
Paint. Ultimately, the best way to deal with a popcorn ceiling may simply be to learn to live with it. Think about it: How many people do you know who live with popcorn ceilings? I bet you can’t specifically remember who has it or doesn’t, because unless a ceiling is highlighted, we don’t typically spend much time looking at it.
Try painting the walls and the ceiling the same color to blur the lines between them, and then create drama at ground level to draw the eye down. You’ll soon forget about your stucco altogether.
5 Mid-century Modern Homes That Make the Most of Their Small Design

Related: Why You Should Embrace Your Midcentury Modern Kitchen

Midcentury Modern 1: Flavin Architects, original photo on Houzz
I’ve been enamored with midcentury modern homes since my childhood in California, where I was privileged to spend time in the intimate houses designed by Frank Lloyd Wright apprentice Mark Mills. Mills was the on-site architect for Wright’s famous Walker House, or Cabin on the Rocks, in Carmel, California, pictured. It was during this time that Mills learned an important lesson from Wright: Reject a larger house in favor of a modest home with flowing spaces and no excess.
The following ideas show how midcentury modern homes beautifully make the most of their space in ways that can easily be incorporated in homes today.

Midcentury Modern 2: Wheeler Kearns Architects, original photo on Houzz
1. Open floor plan.
Above all else, the open floor plan is the defining characteristic of midcentury modern homes. Closed-off rooms gave way to flowing spaces that strung one room to the next to form fluid kitchen, living and dining areas.
In a small home, the key to making the open floor plan work is to understand which rooms need privacy, and when. Of course, bedrooms and bathrooms need separation from the main areas of the home, but it’s also good to consider other areas that need privacy: for example, a study where a parent can work without interruption while the kids play nearby.
In this lake house by Wheeler Kearns Architects, the common areas are located in a centralized area, while the more private areas are off to the side or tucked away on another level.

Midcentury Modern 3: Balodemas Architects, original photo on Houzz
2. Expanded sightlines.
The tendency of midcentury modern homes to have open floor plans speaks to the elegant details often seen within these houses. Without trying to be too sparse, midcentury designers included functional details in their homes that were as uncomplicated as they were beautiful. Finding the balance between sophistication and openness was in the hands of the architect.
Take, for example, the stairs in midcentury modern homes. In this remodel of a midcentury home by Balodemas Architects, they preserved much of the original stair and design. The riser, or the vertical part that connects the stair treads, was simply left out for a lighter appearance. The stair was no longer in a hall but fully opened up and integrated into a room. Walls were often dispensed with entirely. Instead, partial-height screens inspired by Japanese shoji were used to subtly separate spaces.

Midcentury Modern 4: Steinbomer, Bramwell & Vrazel Architects, original photo on Houzz
3. An instance to avoid “open.”
While photographs of midcentury modern homes often feature great walls of glass, what’s often not shown, perhaps because they are not as photogenic, are the equally generous opaque walls.
These walls are key to the home’s aesthetic success. They provide a protective backing to the composition, since the opaque side of the home often faces the road, as with this house by Steinbomer, Bramwell & Vrazel Architects. Although the back of the house is open, with lots of glass and a sense of ease between inside and out, the street-facing side would never give that away. An opaque wall creates a boundary to the outside world while extending the perceived size of the home. Walls of glass are expensive, so opaque walls are also an economical design move.

Midcentury Modern 5: Flavin Architects, original photo on Houzz
4. Everything in its place.
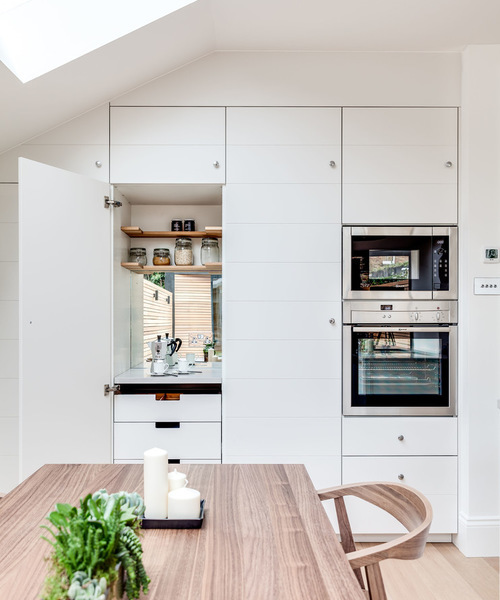
Thoughtful storage is a another key aspect of what makes a small mid-century home completely livable. Most mid-century modern homes, particularly those on the West Coast, had no basements or attics, so storage closets needed to be located among the main living spaces. In part, the answer was to do more with less by having well-designed storage throughout and daily items close at hand, as in this kitchen. This has to be married to an ethic of keeping only what you need and having periodic yard sales.

Midcentury Modern 6: Koch Architects, Inc. Joanee Koch, original photo on Houzz
5. Display with a purpose.
In a small home with innovative but limited storage, it’s important to have display areas for the pieces that don’t need to be tucked away in drawers or closets. This was done beautifully in mid-century modern homes by integrating display areas as a means of aiding with the potential conundrum of scarce storage.
This restoration by Koch Architects shows this exact notion at work. Every other step in the stair has an integrated bookshelf. This would make a perfect rotating library with a range of titles easily seen while ascending the stair.
How to Step Up Your Entry Design With a New Welcome Mat


Welcome Mat 1: Caela McKeever, original photo on Houzz
Say Hello
A lettered mat can help you say exactly what you want to say when someone comes to your door. Obviously nothing says hello more than the word “hello.”
The simple greeting might also draw visitors’ eyes to the ground and remind them to take off their shoes before they step inside.
Coordinate Colors
If you have a colorful front door, use that as doormat inspiration. If your door lacks color, maybe it’s time to paint it.
Door paint: Scarlet Ribbons, Dulux

Welcome Mat 2: Zack | de Vito Architecture + Construction, original photo on Houzz
The whole mat doesn’t need to match the door. This striped mat draws on other colors found on the home’s exterior.

Welcome Mat 3: Rustic Porch, original photo on Houzz
Think Outside the Rectangle
Many front doors feature rectangular doormats, but other options exist. The semicircle mat in the photo works nicely with the rustic rockers, porch swing and shutters.

Welcome Mat 4: Garrison Hullinger Interior Design Inc., original photo on Houzz
Roll Out a Rug
A big, bold rug in front of the door adds color and life to this home’s entry, designed by Garrison Hullinger.
A large porch rug can also make the space feel like another room of the house. If you add a few chairs, people can stop, relax and enjoy the outdoors. Plus, more rug means more chances for it to pick up any water or dirt from the shoes of incoming guests.

Welcome Mat 5: Seattle Staged to Sell and Design LLC, original photo on Houzz
Play With Patterns
An intricate design gives guests a reason to notice this front door mat. A mat’s design can also pull together all the elements of a porch, such as the front door, mailbox, planted blooms and exterior paint.
“I chose the mat because it is fun, colorful, and it accentuated the colors of the house and the plants,” says Shirin Sarikhani, the owner of Staged to Sell and Design in Seattle.
Keep It Natural
If the entry is already bursting with details, such as eye-catching hardware and light fixtures, a neutral mat will help keep the attention on them. Natural doesn’t have to mean boring.

Welcome Mat 6: Grandin Road, original photo on Houzz
Personalize the Space
This contemporary monogrammed mat is hard to miss. “Don’t be afraid to choose a doormat with personality, says Kate Beebe of Grandin Road. “Work some wit and whimsy into your entrance, and choose something that will put a smile on your guests’ faces.”
She also recommends picking a mat that covers at least three-quarters of the entrance’s width and allows the door to open easily.
Change With the Seasons
While you are changing the front porch decor, swap a plain doormat for a festive option.
After the holidays, clean off your seasonal doormat and store it until the following year.
Match Materials
Doormats come in many materials, including ones that mimic entryway hardware. A rubber mat offers the wrought iron look without the weight and expense of the real material.
The punched-out spaces in a rubber mat also catch a lot of little pebbles, which can then be easily swept away with a broom.
Make It Feel Like Home
Doormat options are pretty much endless, so it shouldn’t be hard to find one that works for you.
How to Live Through a Home Remodel

Live Remodel 1: JLB Property Developments, original photo on Houzz
As much as you may be able to glean from friends and family, articles and TV, there’s no experience quite like personally getting down into the dirt (more on this later) of a remodel. And what you don’t often hear about are the harsh realities of wading through such a detailed, often stressful project.
We’ve written before about how remodeling a home is the ultimate litmus test for your relationship. And that’s why I think understanding a few of the common negative things that happen during remodel is a vital component of being prepared.
I’ve not only braved a few remodels myself, but I’ve worked on the other end as a general contractor, and while I can’t claim I know everything, I do think I have a lot to share. Here are a few things you should know about what it’s really like to live through a renovation.
Related: How to Survive the ‘Punch List’ Phase of a Remodel

Live Remodel 2: Turnbull Griffin Haesloop, original photo on Houzz
It Will Upset Your Daily Schedule
Say, for example, every day before you leave for work you like to brew a cup of tea, settle in with your tablet at your breakfast nook and prepare for the day by going through your emails.
Now picture this exact routine while your kitchen and breakfast nook is under construction. The peace and tranquility (and cleanliness!) of your morning retreat is no more.
You may have to alter your daily routine a bit by finding a coffee shop near your house where you can relax, or by relocating to your bedroom for your beloved cup of chai.
Creatures of habit, be warned: You may have to (take a deep breath here) change a couple of your habits while your remodel is going on.
Related: Remodeling Your Kitchen? Move Your Coffee Station to Your Living Room
Contractors often like to take up shop (if permitted) in garages, as they are often places where they can make a bit more of a mess and noise while remaining close to the job site. If you want certain parts of your home, yard or garage to remain sacred, talk with your contractor about areas where work can and cannot occur.

Live Remodel 3: Kasper Custom Remodeling, LLC, original photo on Houzz
There Will Be Dust
This one may be a no-brainer to some and a shock to others (again, take a deep breath). Some contractors will give hints that the project will get dusty, such as: “We will take measures to put up dust barriers around the area of the remodel” or “we will keep a broom and dustpan on site at all times.”
But no matter how many protective products are put up, there are certain stages of construction that can get intense (for example, sanding down drywall). Not only does dust get thrown into the air while work is going on, but it stays floating around in the air for a while afterward. And floating dust’s favorite pastime is, regrettably, travel.
It may travel to different areas of the house, settling into your dog’s bed, onto your kitchen counters and even into your lungs. You may be thinking, “So what? I breathe dust all the time. That’s just life.” This is true, but the dust you’re usually inhaling is dirt and dead skin cells and other organic stuff. Remodeling dust can be made of not-so-nice things such as chemicals found in paint, fiberglass insulation or cement.
Have a conversation with your contractor to see whether he or she plans on using an air scrubber during your remodel as well as dust barriers and traditional cleaning. This combined system helps to prevent dust from traveling, and it also takes a lot of the nasty particulate out of the air before it has time to invade other areas of your house.
While most contractors genuinely work to keep your home clean, safe and comfortable during a remodel, sometimes dust control isn’t a top priority. It will quickly become front and center in your home, though, if it isn’t properly managed from the start.
Related: Bathroom Renovation? Get Ready for the Day in Peace With a Bedroom Vanity

Live Remodel 4: studiovert design, original photo on Houzz
It Can Be an Emotional Roller Coaster
Every person handles stress and emotions differently, but the fact is that having a bunch of unfamiliar faces tear your house apart before your very eyes is stressful. I know that sounds like a bit of hyperbole, but when you’re actually living through a remodel, that’s exactly how it feels.
It can be tough to keep your head on straight when you’re trying to make selections for tile and lighting fixtures that suit your budget while simultaneously worrying about whether the project will end on time. Add family and work life to that? Yikes.
Now that I’ve worked you up, let me provide some peace of mind: Contractors know what they are doing. They will do everything they can to make sure you are happy with your home and the job is completed in a timely manner. Your local YMCA provides yoga classes, which can be very helpful with managing stress. Feeling better?
Accept that you will feel some stress and some emotions, and allow yourself to be OK with that. It’s a part of the process. Freaking out about the fact that you’re freaking out will only make things, well, freakier.

Live Remodel 5: Amanda Armstrong Sava, original photo on Houzz
Now that I’ve shaken up any romanticized beliefs you may have held about remodeling, let me instill a bit of faith by saying that it’s not all bad. Remodeling can actually be quite pain-free, in fact, if you communicate. I know I’ve harped on this before, but I can’t stress the importance of it enough. Talk with your contractor before work starts about things such as scheduling, dust control and communication preferences. It makes a world and a half of difference.
So, yes, there will be dust, and yes, you might get tired of seeing your project manager every day, but there will be days when you come home after work and see new countertops being installed, and it will stop you dead in your tracks because — whoa — those look great!
Other times you might have the house to yourself for a second and you can poke around to “ooh” and “ahh” over all of the new, shiny things filling your beloved home. So not only is it not all bad, some of it is actually pretty good. So good, in fact, that you might even start thinking about your next project before the first one even ends.
